As a matter of fact we, the working professionals, receive many email in a day – many from one single sender (source). In order to organize your inbox you can label your emails according to the topic or sender so that your inbox will look neat and will not be cluttered with all the emails at once. However labelling each email manually once you receive it is troublesome. Moreover it is a nightmare labelling number of emails manually if you open your inbox after few days or when you are back from a holiday.
Here is a small and handy trick to keep your inbox organized and clutter free in no time. With this technique you can route all your incoming emails to a particular folder or label ‘automatically’. Yes. It is possible using ‘Gmail Filters’.
Lets see how to do it in simple steps –
Step 1 : Open an Email in Your Gmail
Go to your Gmail and open the email that resides in your inbox that you wish had arrived in a particular folder.

Step 2 : Expand the Details of the Email
Click on the small triangle as shown in the image below to view the sender details of the mail.

Step 3 : Select the Email Address of the Sender
As shown in the image, select and copy the email address of the sender.

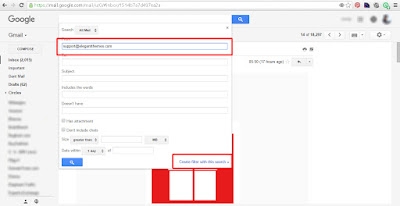
Step 4 : Click Show Search Options
Click to expand the show search options in the top header search bar.

Step 5 : Enter the Copied Senders Address in the Given Field
Paste the copied senders email in the first input box in this section. We are going to create a filter for this email address so that every time this sender sends us a mail we can do some action with it - like storing it in a particular folder or preventing it from going to spam folder, etc. To do this click on the create Filter link at the bottom of the box as shown in the figure below.

Step 6 : Create a Filter for this Email Address
In this step you can checkmark the options as shown in the image.
- First checkmark is to make sure that this email will NEVER show up in your inbox. (Voila! Isnt this what you wanted!)
- Second checkmark is to apply a Label to this type of emails. You can apply an existing label of create a new one.
- Third checkmark is to make sure that mails from this sender will NEVER go to spam folder. In other words you are Whitelisting their email id. Cool, isnt it?
Please refer to the image below -

Step 7 : Create a New Label if Needed.
You can create a new Label for this type of emails.

Step 8 : Give a Suitable Name to the Label.
Give a suitable and memorable name for your reference to this Label.

Step 9 : Superb! Your Label is Created
You will be shown a message that your Label is created.

Now sit back and relax! Next time whenever this sender will send you an email, it will neither show up in your inbox, nor will go to the spam folder but Automatically stored with the Label that you just created for it.
If you liked this tutorial, please share your valuable comments and feedback. Cheers!
No comments:
Post a Comment
Please share your valuable comments and views about this post/ article.